Summary
When deploying a production network, a highly-available Data Server is a best-practice. This minimizes the possibility of service downtime and data loss in the event of a catastrophic failure in a single node, and ensures high-availability for Moxie services.
Moxie 7.05 and higher, supports an automated active/passive failover system when using multiple Data Servers.
Scope
This document is intended as a reference for creating and configuring an automated Moxie failover environment. It covers new Moxie installations as well as Moxie upgrades.
Note:
- For the purposes of this document, the active Data Server has been named "DS1" and the passive or failover Data Server has been named "DS2". This naming convention is used for illustration and clarity purposes only and does not have to be used for implementation of the failover environment.
- This document shows an environment with a single, active Data Server and a single, passive Data Server. Although there can be only one active Data Server at a time, it is possible to configure multiple passive Data Servers, using these techniques.
Architecture
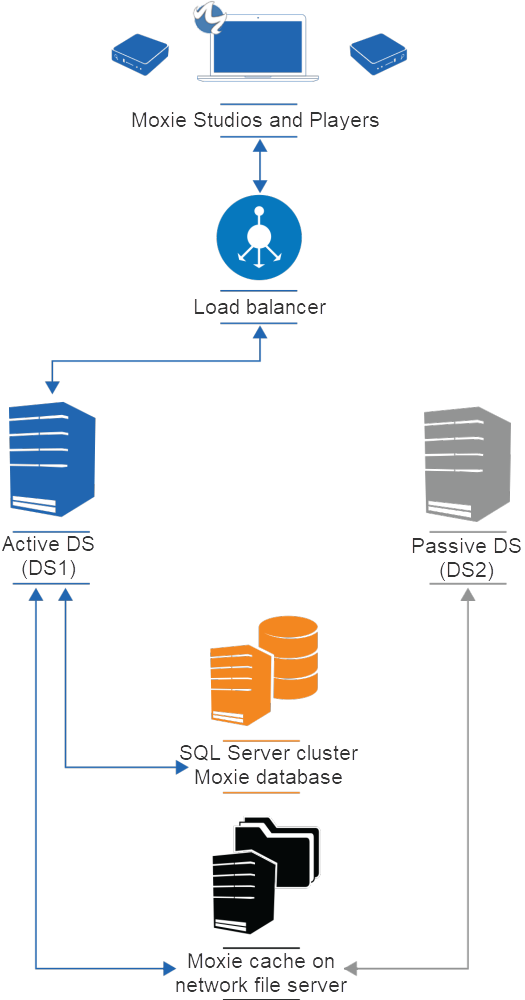
Stage 1 (with load balancer) - Studios and Players connected to Active Data Server

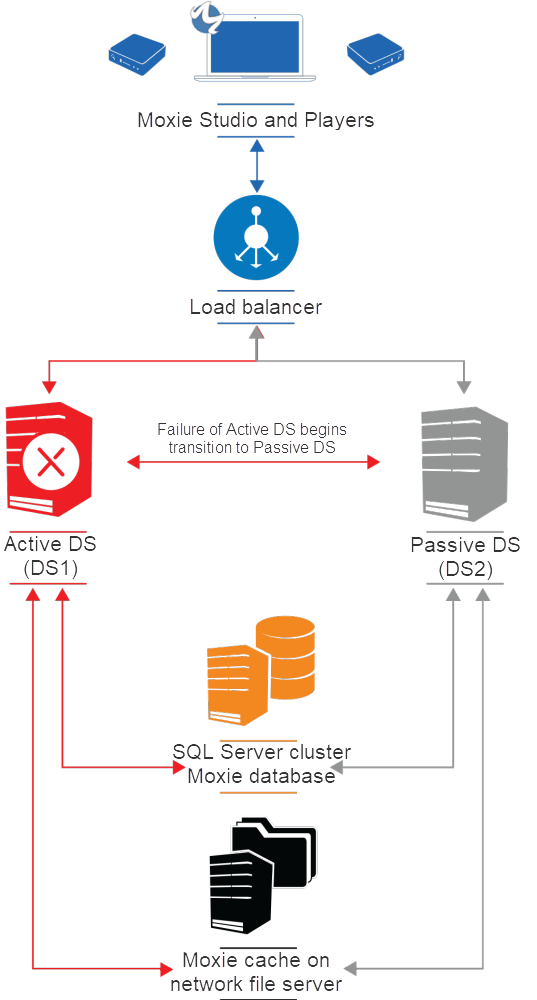
Stage 2 (with load balancer) - Failure of Active Data Server

Stage 3 (with load balancer) - Failover to formerly-passive Data Server

Stage 1 (without load balancer) - Studios and Players connected to Active Data Server

Stage 2 (without load balancer) - Failure of Active Data Server

Stage 3 (without load balancer) - Failover to formerly-passive Data Server

Prerequisites
There are two recommended failover mechanisms:
- Using a load balancer to redirect Moxie clients. The load balancer must be:
- assigned a FQDN and static IP address
- be configured for active-passive mode (there is only one active Data Server at a time and 100% of the load is always on a single Data Server).
When configuring the Data Server address in the Connection Wizard, it is the FQDN assigned to the load balancer.
This method enables clients to reconnect to a Data Server faster than method two.
- Using a “virtual” FQDN configured to the active Data Server’s CNAME record. Failover is accomplished using a triggered application or script to automate changes to the virtual FQDN in the DNS server.
Example of configuration in a Windows Server environment:
- A fully qualified domain name for Data Server, set in DNS server. The fully qualified domain name for the Data Server should be created with a CNAME record, for example "ds.domain.com". In the CNAME record properties, set the Time to Live (TTL), which tells the client when to refresh the value from the DNS Server, to 1 minute.

Based on this value, clients typically reconnect within 2-3 minutes (dependant on various factors such as when the DNS Time to Live expires and the reconnect timer within the client).
- Use the fully qualified domain name in the Data Server Connection Wizard for Moxie components, instead of the named Data Server’s hostname.
Set this up using an A record for each Data Server (with their IP address) and a CNAME record for the fully qualified virtual domain name:
- DS1.domain.local A 192.168.200.101
- DS2.domain.local A 192.168.200.102
- DS.domain.local CNAME DS1.domain.local (on failover this would be set to DS2.domain.local)
Note: DNS entries’ TTL can be verified at the client using ipconfig /displaydns. The A records can be dynamically assigned with DHCP and DNS registration in a domain environment, instead of manually assigned.
Create a file share to be used for both Moxie Data Servers’ caches. In this example, a network share is used, but this could also be done with another technology, such as replicated folders using DFS, etc.
Installing the Data Servers
- Install the active Moxie Data Server (DS1) first, using the following configuration (Note: If no instructions are given for a particular setting, it does not affect the automated failover and you should configure it as per the requirements for your installation):
- Set the Data Source to Microsoft SQL Server.

- Set up the account the Data Server uses to access the database (We recommend using SQL authentication for this application, as Windows authentication requires the Data Server be configured to run as an Administrator in the Service Control Manager)

- Configure the file cache. Use a UNC path to your network share, and select Use Impersonation so the Data Server can access the cache location.
Note: If Use Impersonation is disabled, the Data Server service must be configured to run as an account that has access to the cache location.

- Configure the failover settings. The settings you use are dependant on the failover method you are using.

If you are:
- using a load balancer (the first method), clear Run application.
- changing the active Data Server’s DNS for the virtual FQDN (the second method), select Run Application.
The following is an example of a sample PowerShell script to change the DNS entry, adapted from MS documentation. This requires the DNSServer module enabled in PowerShell):
$OldObj = Get-DnsServerResourceRecord -Name "ds" -ZoneName "domain.local"
$NewObj = $OldObj.Clone()
$NewObj.RecordData.HostNameAlias = "DS1.domain.local."
Set-DnsServerResourceRecord -NewInputObject $NewObj -OldInputObject $OldObj -ZoneName "domain.local" –PassThru
Set the $NewObj.RecordData.HostNameAlias to either DS1.domain.local. or DS2.domain.local., depending on which Data Server is running the script. Each Data Server must have its own version of the script to change the CNAME to the active Data Server.
Note: All MDSC settings for subsequent, passive Data Server installations must match the active Data Server’s configured settings, including: database setup, SQL server account, Data Server setup (port, dedicated DataPipe port, cache location), Client identification (player ID, passphrase, default player content), encryption and permission settings.
- In the Data Server Connection Wizard on the Data Server, in Address or host name, use localhost.

- If you are installing Log Server on the same computer as the Data Server, then use the fully qualified domain name (ie. DS.domain.local) in the Log Server Configuration Wizard, so that CLAs get the fully qualified domain for connections.

- Prior to installation on DS2, stop all Moxie services on DS1.
- Install Moxie Data Server on DS2:
- in the MDSC, use the same settings as for DS1, except for the script used on the Failover page, which should be the one for DS2
- in the Data Server Connection Wizard, use localhost
- if installing Log Server on the same computer, then use the fully qualified domain name
- Stop all Moxie services on DS2.
- Both Data Servers must be registered separately with their own license. The licenses should match in terms of user and player counts.
- Start all Moxie Services on DS1, then on DS2 and any subsequent Data Servers.
- If you launch the MDSPC tool on:
- DS1 (the active Data Server), the Status is Running [Active]

- on DS2 (or any subsequent Data Server), the Status is Running [Passive]

- When browsing to the cache folder location, there is a Failover sub-folder.

The Active.txt contained in this folder lists the host name of the current active Data Server. This file is used by all the Data Servers to determine which Data Server is currently active.
Installing Studios and Players
- Install Studios and Players, following the standard installation instructions.
- In the Data Server Connection wizard, in Address or host name, use the domain name specified in the CNAME record.

Failover scenario from the Studio perspective
- When the Data Server is running and the Studio has successfully connected, the status bar in the studio shows the connected Data Server.
![]()
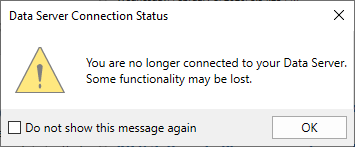
- If the Data Server becomes unavailable, the Data Server Connection Status dialog box appears.

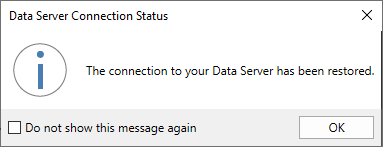
- When the automated failover occurs, the dialog box changes to show that the connection to the Data Server is restored.

- The status bar in the Studio changes to reflect the failover Data Server name.
![]()
Upgrade path
- Upgrade active Data Server (DS1) as per usual, making sure services are stopped on any passive Data Servers. Complete the MDSC, Data Server Connection Wizard and Log Server Connection Wizard (if applicable).
- Before upgrading DS2, stop all services on DS1.
- Upgrade DS2 and complete the MDSC, Data Server Connection Wizard and Log Server Connection Wizard (if applicable). The Clients connect to DS2 and it is the active Data Server.
- Start Moxie services on DS1. This Data Server is in passive mode.
FAQ
- How do I know if the automatic failover is operating?
- Open MDSPC tool on the passive Data Server(s).
- Manually trigger an issue on the active Data Server. This could be done by:
- rebooting active Data Server
- manually stopping the Data Server service
- powering off the the active server
- terminating the Data Server process on the active server
- remove access to SQL or the cache from the active server
- MDSPC shows the passive server taking over as an active server when it detects the active Data Server is no longer operating.
- Do I need a failover environment for the DataPipe Server and the Data Suite products?
- Secondary DataPipe Server is already configurable
- Other Data Suite products can reside on the same server as the DataPipe Server
- What about my SQL Server Cluster?
SQL Server Cluster is redundant, by definition
- Do I need a redundant Moxie cache location?
Yes, the Moxie share should be made redundant by whatever technology you use
- Do I still need to plan for a disaster recovery situation?
Yes. Even though, by definition, all components are made redundant by having multiple Moxie services, SQL cluster and a redundant file share for the cache, this does not alleviate the need for a disaster recovery scenario. Plan backup of SQL databases and the Moxie file share accordingly.